
One of the most surprising discoveries for new potters is that their finished pieces are significantly smaller than when they created them. Clay shrinkage is a fundamental characteristic of ceramic materials, affecting every piece from the moment you start working to the final opening of the kiln. Understanding why clay shrinks, how much to expect, and how to work with this inevitable transformation is essential for creating successful pottery. This comprehensive guide explores the science behind clay shrinkage, typical shrinkage rates, and practical strategies for managing this crucial aspect of ceramic work.
Check out our free clay shrinkage calculator.
What is Clay Shrinkage?
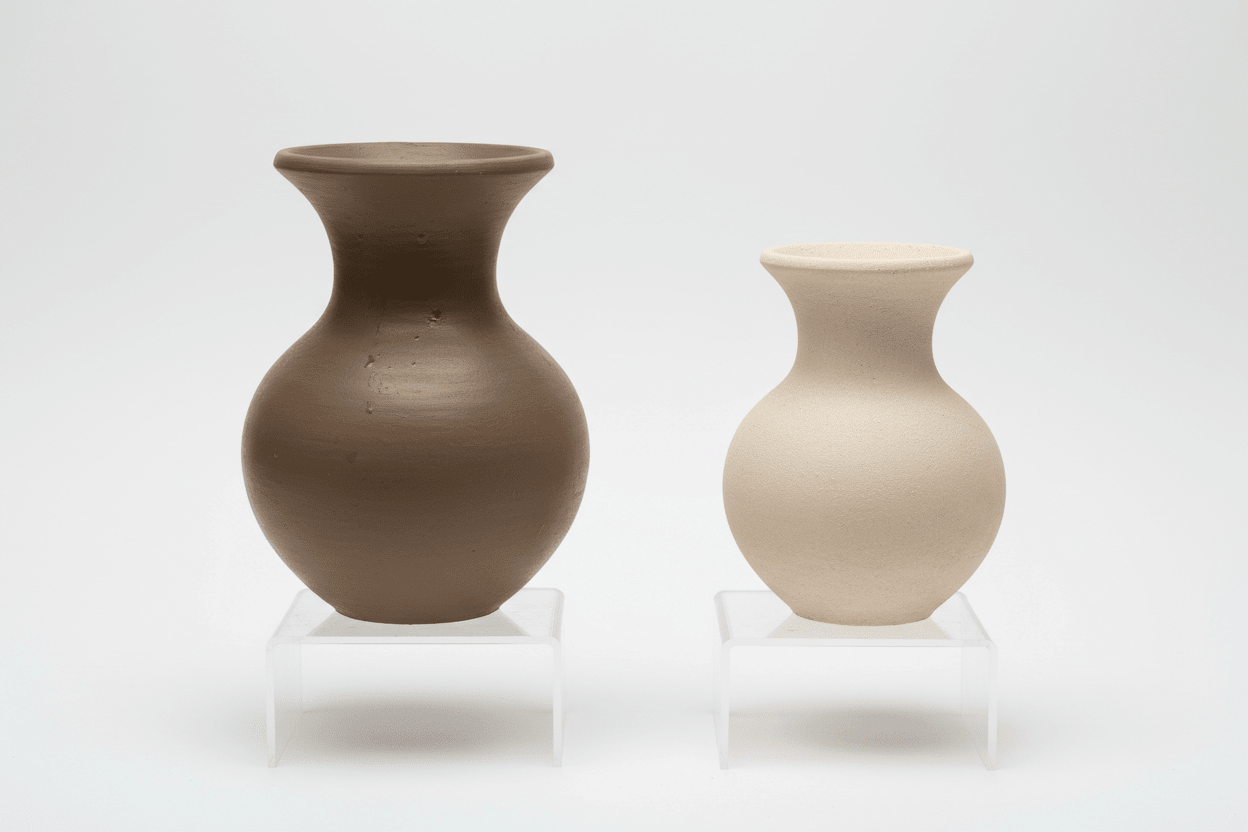
Clay shrinkage refers to the reduction in size that occurs as clay loses moisture during drying and undergoes chemical changes during firing. A piece that measures ten inches wide when freshly thrown might be only nine inches wide after bisque firing and eight and a half inches after glaze firing. This dimensional change happens in all directions—height, width, and depth—meaning volume decreases substantially.
Shrinkage is not a flaw or problem to be solved but rather an inherent property of clay materials. All natural clays shrink, and understanding this shrinkage allows you to plan dimensions, prevent cracking, and create pieces that fit together properly after firing.
The total shrinkage from wet clay to finished pottery typically ranges from eight to sixteen percent, though some clays shrink as little as four percent while others exceed twenty percent. This variation depends on clay composition, forming method, and firing temperature.
Why Does Clay Shrink?
Clay shrinkage occurs in two distinct phases: drying shrinkage and firing shrinkage. Each phase has different causes and characteristics.
Drying Shrinkage: Water Loss
When you work with plastic clay, you're manipulating a mixture of clay particles, water, and air. The water acts as a lubricant between clay particles, allowing them to slide past each other and making the clay workable. Clay typically contains twenty-five to thirty percent water by weight when in its ideal plastic state.
As clay dries, water evaporates from between the clay particles. As water molecules leave, the particles move closer together to fill the empty spaces, causing the entire piece to shrink. This drying shrinkage accounts for roughly half of the total shrinkage your pottery will experience.
The shrinkage continues until the clay reaches what's called "bone dry"—the point where all atmospheric water has evaporated. At this stage, clay particles are packed as tightly as they can get without firing, and no further drying shrinkage occurs. The clay is lighter in color, uniform throughout, and feels at room temperature rather than cool to the touch (the coolness of damp clay comes from evaporating water).
Firing Shrinkage: Chemical and Physical Changes
Even after clay is completely dry, it continues to shrink during firing. This firing shrinkage results from several processes occurring at high temperatures.
First, chemically bound water—water molecules that are part of the clay's crystal structure rather than just sitting between particles—is driven off between approximately 660-900°F (350-480°C). This loss causes additional particle compaction and shrinkage.
As temperatures continue rising, clay particles begin to sinter—fusing together at their contact points without fully melting. This sintering process draws particles even closer together, creating permanent bonds and additional shrinkage. The higher the firing temperature, the more complete this sintering becomes, and generally, the more the clay shrinks.
At high-fire temperatures, some clay bodies begin to vitrify—becoming glass-like as silica and fluxes melt and fill the spaces between clay particles. This vitrification creates the strongest, most durable ceramics but also causes the greatest shrinkage.
Typical Shrinkage Rates by Clay Type
Different clay bodies shrink at different rates based on their composition and intended firing temperature.
Earthenware Clays
Earthenware, fired at lower temperatures (cone 06-04), typically shrinks eight to twelve percent total. The lower firing temperature means less sintering and vitrification, resulting in more moderate shrinkage. These clays remain somewhat porous even after firing, indicating incomplete particle fusion.
The relatively low shrinkage makes earthenware more forgiving for beginners and suitable for large sculptural work where excessive shrinkage could cause structural problems. However, the porosity that comes with lower shrinkage means earthenware isn't fully waterproof unless glazed.
Stoneware Clays
Stoneware fired at mid to high temperatures (cone 5-10) shrinks ten to fifteen percent typically. As firing temperature increases within the stoneware range, shrinkage also increases. A stoneware clay fired to cone 6 might shrink twelve percent, while the same clay fired to cone 10 could shrink fourteen percent.
Stoneware achieves complete vitrification at proper firing temperature, becoming non-porous and fully functional. This vitrification requires significant particle movement and compaction, explaining the higher shrinkage compared to earthenware.
Porcelain Clays
Porcelain, the most refined clay body, typically shrinks twelve to eighteen percent or even more. The fine particle size of porcelain allows for extreme compaction during drying and firing. High-fire porcelain (cone 10) often exceeds fifteen percent shrinkage, with some formulations reaching twenty percent.
This high shrinkage makes porcelain technically challenging. Large pieces are prone to warping, and the dramatic size change requires careful planning. However, the extreme vitrification that causes this shrinkage also creates porcelain's prized translucency, strength, and refined appearance.
Grogged and Sculptural Clays
Clays containing grog (pre-fired clay particles), sand, or other non-plastic materials shrink less than smooth clays. These additives don't shrink, so they effectively dilute the shrinkage of the plastic clay component. A heavily grogged sculpture clay might shrink only six to eight percent, making it ideal for large sculptural work where minimal shrinkage reduces cracking and warping risks.
The trade-off is that grogged clays are less plastic, harder to throw on the wheel, and create rougher surfaces. But for hand-building and sculpture, reduced shrinkage often outweighs these considerations.
Measuring and Calculating Shrinkage
Understanding your specific clay's shrinkage rate helps you plan dimensions and troubleshoot problems.
Creating Shrinkage Rulers
The most practical way to understand your clay's shrinkage is creating a shrinkage ruler—a simple test that shows exactly how much your clay shrinks from wet to fired.
Roll out a slab of clay about half an inch thick. Using a ruler, mark and cut a strip exactly ten centimeters (or ten inches) long. Mark clear lines at zero and ten. Use a pencil or knife to inscribe these marks deeply so they remain visible after firing.
Allow the strip to dry completely, then measure the distance between your marks. This shows drying shrinkage. Fire the strip to your intended temperature and measure again. The difference from wet to fired dimensions tells you total shrinkage percentage.
For example, if your ten-centimeter bar measures 9.2 centimeters after firing, you have eight percent shrinkage (0.8 cm shrinkage divided by 10 cm original length equals 0.08 or eight percent).
Calculating Required Initial Size
Once you know shrinkage percentage, you can calculate the size to make pieces to achieve specific finished dimensions. If you need a finished bowl that's exactly eight inches diameter and your clay shrinks twelve percent, divide your target size by 0.88 (one minus 0.12):
8 inches ÷ 0.88 = 9.09 inches
Make your bowl 9.09 inches diameter when wet, and it will shrink to eight inches after firing.
For production potters creating sets or pieces that must fit together, this calculation ensures consistency across multiple firings.
Shrinkage Variations Within a Single Clay Body
Even the same clay batch can shrink differently based on how you work it. Heavily worked clay with aligned particles may shrink more than minimally worked clay. Clay thrown on the wheel shrinks differently than hand-built clay from the same batch because throwing aligns particles in specific directions.
Thickness affects apparent shrinkage too. Thick sections retain moisture longer and dry more slowly, potentially creating stress between thick and thin areas as they shrink at different rates. This differential shrinkage causes many cracks in pottery.
Problems Caused by Shrinkage
While shrinkage itself is inevitable, problems arise when shrinkage occurs unevenly or when potters don't account for it in their planning.
Cracking from Differential Shrinkage
Cracks occur when different parts of a piece shrink at different rates. If one area dries and begins shrinking while another remains damp and full-size, stress builds until something cracks. Common scenarios include:
- Thick bottoms that stay wet while walls dry and shrink
- Rims that dry quickly while bases remain damp
- Handles attached with moisture mismatch
- One side exposed to air or heat while the other side stays cool and damp
Prevention requires managing moisture content throughout your piece. Cover work loosely with plastic to slow drying and allow moisture to equalize. Rotate pieces so all sides dry evenly. Ensure attached elements like handles are at the same moisture level as the main body.
Warping and Deformation
As clay shrinks during drying and firing, pieces can warp if shrinkage isn't uniform. Plates may develop wavy edges, cylinders may lean, and flat slabs may curl. This happens when one area shrinks more than another, pulling the piece out of shape.
Causes include uneven wall thickness, asymmetric forms, pieces stuck to non-porous surfaces during drying, and improper support during firing. Very thin areas shrink and pull more than thick areas, creating distortion.
Prevention involves maintaining even thickness throughout pieces, using porous drying surfaces that allow uniform moisture release, properly supporting work during drying and firing, and avoiding excessively thin or thick areas.
Lids That Don't Fit
One of the most frustrating shrinkage issues is lids that no longer fit their pots after firing. Since pottery shrinks in all directions, both the pot opening and the lid shrink. If they don't shrink at exactly the same rate, the fit changes.
Prevention requires making lids and pots from the same clay batch, ensuring similar wall thickness in the lid and pot rim area, drying them together at the same rate, and firing them in the same kiln load. Many potters fire lids on their pots during bisque firing to help ensure matching shrinkage, though lids should be removed for glaze firing to prevent sticking.
Handles and Attachments Pulling Away
Handles, spouts, feet, and other attachments can crack or pull away from the main body if shrinkage rates don't match. This typically happens when attaching wet elements to leather-hard bodies, or when attachments have different clay composition than the main piece.
Prevention requires attaching elements at matching moisture levels (leather-hard to leather-hard is ideal), using the same clay body for attachments as the main piece, properly scoring and slipping joints, and allowing moisture to equalize after attachment by covering the piece with plastic for several hours.
Working With Shrinkage: Best Practices
Rather than fighting shrinkage, successful potters work with it as part of the creative process.
Plan for Size Changes
When creating pottery for specific uses—dinnerware that must fit in cabinets, planters for specific spaces, or sets where pieces must match—always account for shrinkage in your initial dimensions. Make test pieces first to verify your calculations before committing to production.
For commissioned work where size matters, communicate with clients using finished dimensions, not wet dimensions. A mug that's four inches tall when thrown might be only three and a half inches after firing.
Embrace Even Thickness
Maintaining consistent wall thickness isn't just about aesthetics—it's crucial for managing shrinkage. Even thickness means even moisture content, leading to even drying and shrinkage. This single practice prevents most cracking problems.
When throwing, develop the skill to create consistent walls from rim to base. In hand-building, roll even slabs and build with consistent thickness throughout. Check thick areas by feel and trim or compress them to match thinner sections.
Control Drying Conditions
Slow, even drying gives clay time to shrink uniformly without developing stress cracks. Cover pieces loosely with plastic, leaving some air circulation but preventing rapid drying. Maintain consistent room temperature and avoid placing work near heaters, air conditioners, or sunny windows.
For pieces with thick and thin sections, deliberately slow the drying of thin areas by wrapping them with damp paper towels covered with plastic while allowing thick areas to dry uncovered. This equalizes moisture loss rates.
Use Appropriate Clay Bodies
Match your clay choice to your project requirements. Large sculptural work benefits from low-shrinkage grogged clays that minimize cracking and warping. Delicate porcelain work accepts high shrinkage because the refined results justify the challenges. Production potters often prefer moderate-shrinkage stoneware that balances workability with predictable results.
Test different clay bodies to find ones that suit your work style, forms, and firing temperature. A clay that shrinks predictably and consistently is more valuable than one with slightly lower shrinkage but erratic behavior.
Shrinkage and Production Planning
For potters producing work for sale, understanding shrinkage affects pricing, timing, and inventory management.
Factor Shrinkage Into Production Costs
Shrinkage means you need more clay than the finished piece contains. A bowl that weighs two pounds after firing required roughly two and a quarter pounds of wet clay, accounting for water loss. This affects clay costs, especially when working with expensive materials like porcelain.
Plan Production Timing
Pieces must progress through drying and firing at rates that account for shrinkage-related delays. Rushing drying causes cracks, while proper drying takes time. Build this reality into production schedules, allowing adequate time for large or thick pieces to dry safely.
Quality Control and Shrinkage
Monitor shrinkage rates as quality control. If pieces from the same clay batch show varying shrinkage, investigate potential causes—inconsistent wedging, moisture variations, or contamination. Consistent shrinkage indicates good material control and proper technique.
Advanced Shrinkage Considerations
Experienced potters develop nuanced understanding of how shrinkage affects their specific work.
Shrinkage and Glaze Fit
Clay shrinkage continues during glaze firing while glazes also shrink. If clay and glaze shrink at different rates during cooling, stress develops that can cause crazing (crackle patterns) or shivering (glaze popping off). Proper glaze fit requires compatible thermal expansion coefficients between clay and glaze, accounting for how both materials behave during cooling.
Directional Shrinkage
Clay shrinks more in some directions than others. Thrown pottery typically shrinks more in height than diameter because wheel throwing aligns clay particles vertically. Slab-built work may shrink differently along the direction the slab was rolled versus across it. Understanding these directional differences helps prevent warping in complex forms.
Shrinkage in Altered Forms
When altering thrown forms—faceting cylinders, darting bowls, or adding texture—consider that these alterations affect how shrinkage stresses distribute. Compressed areas shrink differently than stretched areas, potentially causing cracks at transition points. Allow altered pieces to rest briefly so clay can relax before continuing to work.
Conclusion: Shrinkage as a Constant Companion
Clay shrinkage is one of pottery's fundamental realities, present in every piece from the simplest pinch pot to the most refined porcelain vessel. Rather than viewing shrinkage as a problem, successful potters understand it as an essential characteristic of their material—one that requires respect, planning, and technical skill to manage well.
By understanding why clay shrinks, how much to expect, and how to work with shrinkage rather than against it, you can prevent most shrinkage-related problems while creating pottery that consistently meets your dimensional and quality standards. The piece you're working with wet clay will indeed be smaller when it emerges from the kiln, but with knowledge and practice, this transformation becomes predictable, manageable, and simply part of the fascinating process of turning soft earth into permanent ceramic art.

Share:
Common Pottery Defects and How to Prevent Them: A Comprehensive Guide
How to Use a Pottery Wheel for Beginners: Your Complete Step-by-Step Guide