
Few things are more frustrating for a potter than discovering cracks in a piece you've invested hours creating. Whether you find hairline fractures during drying, hear the devastating ping of a crack forming in the kiln, or discover splits after glazing, pottery cracking is one of the most common challenges ceramic artists face.
Understanding why pottery cracks—and how to prevent it—is essential for developing successful pottery practice. This comprehensive guide explores the various causes of cracking at every stage of the pottery process and provides practical solutions to keep your work intact.
Understanding Why Clay Cracks
Before diving into specific causes and solutions, it's helpful to understand the fundamental reason clay cracks. Clay shrinks as it dries and again during firing. Cracking occurs when different parts of a piece shrink at different rates, creating stress that exceeds the clay's strength. This differential shrinkage can happen due to uneven drying, structural weaknesses, clay body issues, or firing problems.
Check out our free clay shrinkage calculator here.
The key to preventing cracks is ensuring even moisture content throughout your piece and maintaining consistent conditions during drying and firing. While some cracking issues stem from clay body composition or firing schedules, most cracks in beginner pottery result from drying problems—the good news is these are entirely preventable with proper technique.
Cracks During the Drying Stage
The majority of pottery cracks occur during drying, when clay transitions from wet and plastic to bone dry. This stage requires patience and attention, as rushing the process almost guarantees problems.
Uneven Drying: The Primary Culprit
When one part of your pottery dries faster than another, differential shrinkage creates stress. The drier section tries to shrink while the wetter section resists, and eventually something gives—usually in the form of a crack. This commonly happens when pottery is exposed to drafts, direct sunlight, or heating vents that dry one side faster than the other.
Thick-bottomed pieces are particularly vulnerable because the bottom stays wet longer than the walls. As the walls shrink, they pull against the still-damp base, creating rim cracks or separation between the bottom and walls. Similarly, thick handles or attachments dry at different rates than the main body, causing cracks at the joints.
The solution is slow, even drying in a controlled environment. Cover pieces loosely with plastic to slow moisture loss, allowing moisture to equalize throughout the piece. Rotate pieces periodically so all sides dry at similar rates. For thick-bottomed work, place pieces on a porous surface like a wooden board or drywall that allows moisture to escape from the bottom.
Consider creating a drying cabinet or simply covering your work with plastic bags weighted at the edges but not sealed, allowing very slow moisture escape. This extended drying period might feel frustratingly slow, but it prevents the heartbreak of cracked work.
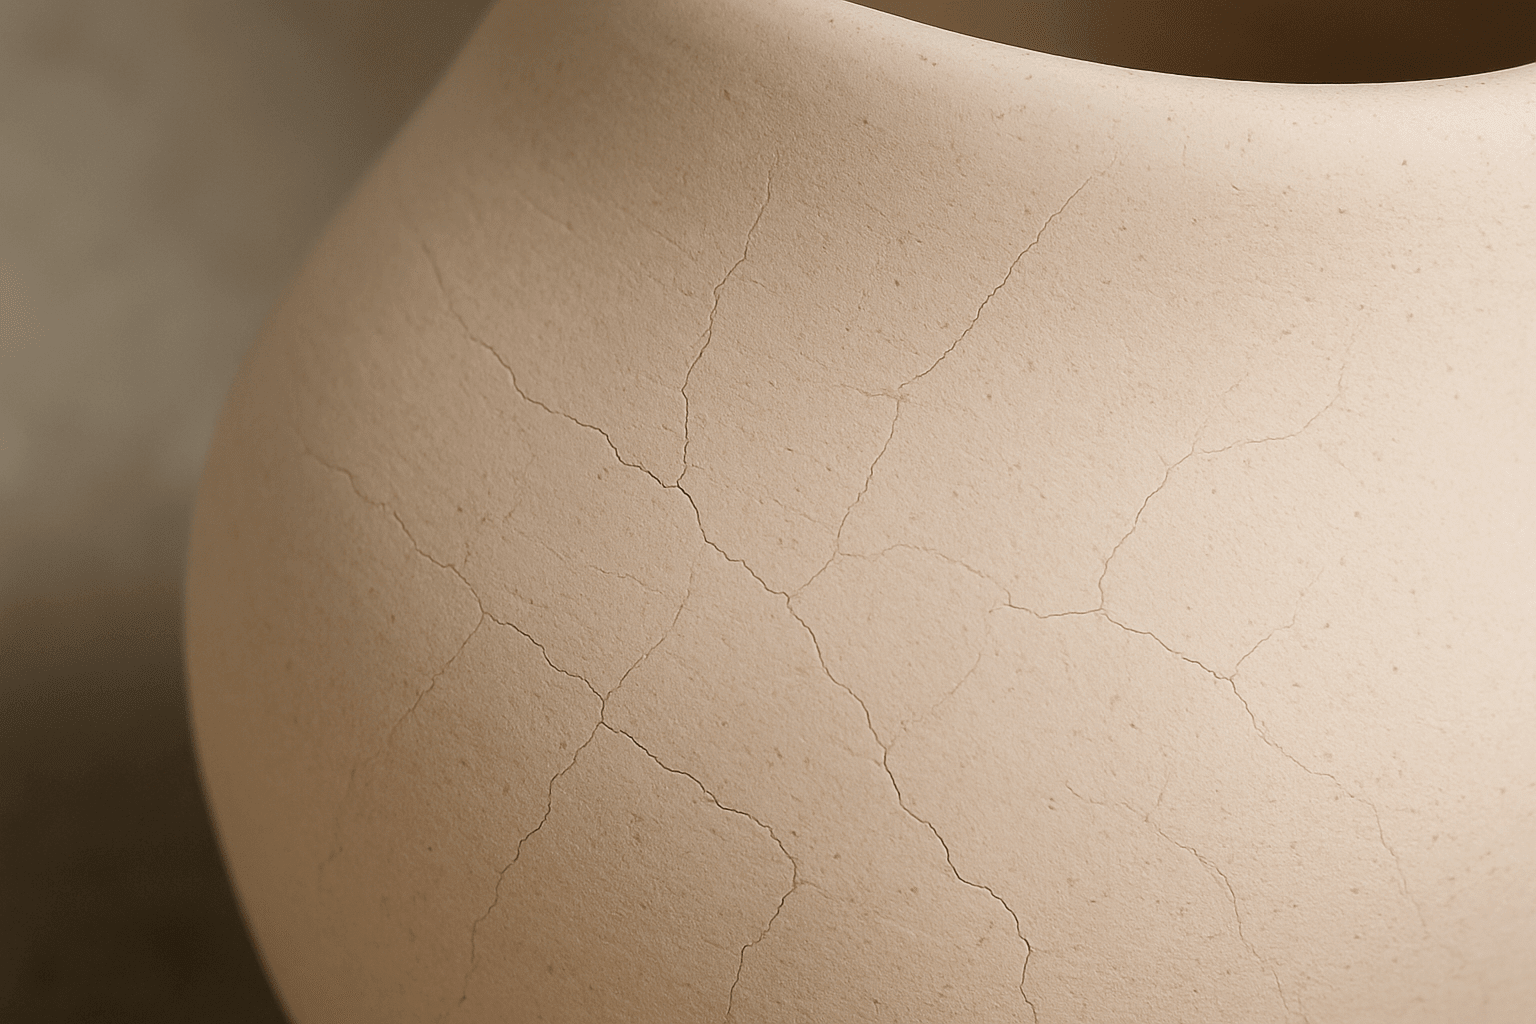
S-Cracks: The Tell-Tale Bottom Crack
S-cracks, also called dunting cracks, appear on the bottom of thrown pottery in a distinctive S or C shape. These occur when the bottom of a vessel is compressed too much during throwing or when the bottom dries and shrinks while still attached to an impermeable surface like a plastic bat.
During throwing, excessive pressure when creating the floor can compress the clay particles so tightly that the bottom becomes denser than the walls. As everything dries, the denser bottom tries to shrink more than the walls, creating stress that manifests as an S-shaped crack.
Prevent S-cracks by using appropriate pressure when throwing the bottom—enough to create a smooth, even floor but not so much that you're compacting the clay excessively. Always remove thrown pieces from the wheel head or bat promptly using a wire, and place them on a porous surface for drying. If you must leave pieces on bats, use porous wooden bats rather than plastic.
Rim Cracks in Handbuilt Work
Handbuilt pieces, particularly coil-built or slab-built work, often develop cracks along the rim. This happens when the rim dries and shrinks while the base remains damp and full-sized. The shrinking rim pulls against the base, and eventually cracks form, often appearing as small splits in the rim that can extend downward.
Prevention requires attention to moisture balance during construction. When building with coils or slabs, keep all parts at similar moisture levels. Cover completed sections with plastic while working on new areas. When finishing a piece, deliberately slow the rim's drying by wrapping it with a damp paper towel covered with plastic while allowing the base to dry.
Joint Cracks and Attachment Failures
When handles, spouts, feet, or decorative elements crack off or develop cracks at their attachment points, it usually indicates inadequate joining technique or moisture mismatch. If you attach a soft, freshly made handle to a leather-hard mug body, the handle will shrink more during drying, pulling away from the body and potentially cracking.
Proper attachment technique prevents these issues. Score both surfaces thoroughly, creating crosshatch marks that provide mechanical grip. Apply slip (clay mixed with water to a creamy consistency) generously to both scored surfaces. Press the pieces together firmly, working the clay at the joint to create a strong bond. Most importantly, ensure both pieces are at the same moisture level—leather-hard to leather-hard provides the strongest joins.
After attaching elements, cover the entire piece loosely with plastic for several hours to allow moisture to equalize before resuming normal drying.
Cracks During Bisque Firing
Bisque firing transforms raw clay into permanent ceramic through chemical and physical changes. Cracks during bisque firing typically indicate either residual moisture in the clay or problems with the firing schedule.
Moisture-Related Explosions and Cracks
Clay that isn't completely bone dry when loaded into the kiln retains water that turns to steam during firing. This steam expands and needs to escape. In thick pieces or pieces with trapped air pockets, the steam buildup can cause dramatic explosions or smaller cracks as the pressure finds weak points.
Water exists in clay in different forms. Atmospheric water evaporates at room temperature during normal drying. But water molecules attached to clay particles (chemically bound water) don't release until the clay reaches approximately 215°F (100°C). If this water converts to steam too quickly, pressure builds inside the clay.
Prevention requires patience. Allow pieces to dry completely until they're bone dry—uniform light color throughout with no dark, damp areas. Even pieces that feel dry to the touch can retain moisture internally. When in doubt, give pieces extra drying time. Some potters place questionable pieces on top of the warm kiln during a firing to ensure complete dryness before their own firing.
The bisque firing schedule should include a slow initial temperature rise, often called a "candling" stage, where the kiln is held at very low temperature (around 200°F or 95°C) for several hours. This allows any remaining moisture to escape safely before temperatures rise high enough to cause problems.
Thermal Shock and Quartz Inversion
Clay bodies undergo a critical transformation around 1063°F (573°C) called quartz inversion, where crystalline silica in the clay changes structure and briefly expands. If the kiln temperature rises or falls too quickly through this range, thermal shock can cause cracking, particularly in pieces with uneven thickness or those made from clay bodies high in free silica.
The solution is following proper firing schedules that slow the temperature rise through the critical quartz inversion range. Most standard bisque schedules naturally account for this, but if you're programming your own schedules or experiencing unexplained bisque cracks, pay special attention to a gradual rise from 950°F to 1100°F (510°C to 595°C).
Cracks During Glaze Firing
Finding cracks in otherwise successful pieces after glaze firing is particularly heartbreaking. These cracks have several possible causes, most related to thermal stress or glaze fit issues.
Dunting: The Sharp Crack of Thermal Stress
Dunting produces distinctive cracks that often make an audible "ping" sound during cooling. These cracks typically run straight across a piece or create sharp, clean breaks. Dunting occurs when different parts of a piece are at different temperatures during firing, causing differential expansion or contraction that exceeds the clay's strength.
Opening the kiln before it has cooled sufficiently is a common cause of dunting. That rush to see your finished work can introduce cool air that rapidly contracts the outer surface while the interior remains hot and expanded. The stress from this temperature difference causes cracks.
Dunting can also occur during heating if the temperature rises too quickly, particularly through the quartz inversion point during both heating and cooling. Large, thick pieces are most vulnerable because heat penetrates slowly through thick walls, creating temperature gradients.
Prevention requires patience with firing schedules and cooling. Never open the kiln until it has cooled below 200°F (95°C). Follow recommended heating and cooling rates for your clay body, particularly during critical temperature ranges. For large or thick pieces, consider even slower schedules that allow heat to penetrate evenly throughout the piece.
Glaze Compression and Shivering
While glaze crazing (fine cracks in the glaze surface) is fairly common and sometimes desirable, severe glaze fit problems can cause structural cracks in the clay body itself. When glaze shrinks significantly more than the clay during cooling, it creates compression that can crack the piece. This appears as cracks that extend through both glaze and clay body, often running straight across a piece.
Shivering, the opposite problem, occurs when glaze is under too much tension. Pieces of glaze actually pop off, sometimes taking clay with them. While technically not cracking, it indicates severe glaze fit problems that need addressing.
Prevention involves using glazes properly formulated for your clay body and firing temperature. If you're mixing your own glazes, understanding glaze chemistry and thermal expansion coefficients becomes important. For most potters using commercial glazes, following manufacturer recommendations for clay type and firing temperature prevents glaze-related cracking.
Structural Cracks in Specific Forms
Certain pottery forms are prone to characteristic cracks based on their structure and construction.
Cracked Lids and Flanges
Lids often crack where the flange (the part that fits into the pot) meets the lid top. This happens because the flange and lid top are essentially two different thicknesses joined together, creating a stress point during drying and firing. The transition point bears the stress of differential shrinkage.
Prevent lid cracks by ensuring even thickness throughout, with gradual transitions between the flange and lid top rather than sharp changes in thickness. Slow drying is particularly important for lids.
Plate and Platter Cracks
Flat forms like plates and platters are prone to S-cracks on the bottom and cracks radiating from the center. The center of a plate dries last because moisture has farther to travel to evaporate, while the rim dries quickly. This creates stress as the rim shrinks while the center resists.
Prevention requires careful attention to even wall thickness and very slow drying. Some potters place a small piece of plastic over the center of plates while leaving the rim exposed, balancing drying rates. Always place plates on porous surfaces to allow moisture escape from the bottom.
Bottle and Closed Form Cracks
Enclosed forms like bottles and vases with narrow necks can trap moisture inside during drying, creating a humid microclimate that keeps the interior wet while the exterior dries. This differential creates stress that manifests as cracks, often appearing around the middle of the form or where the neck joins the body.
Prevent these cracks by ensuring adequate air circulation inside closed forms during drying. Point a small fan at the mouth of bottles to encourage air movement. Consider leaving these forms uncovered during the early stages of drying to allow interior moisture to escape, then covering them to slow exterior drying once interior moisture has diminished.
Clay Body Issues Contributing to Cracking
Sometimes cracking problems stem from the clay body itself rather than your technique.
Old or Improperly Stored Clay
Clay that's been sitting around for months or years can develop uneven moisture distribution, with outer clay drying while inner clay remains wet. Using this clay without proper reconditioning creates pieces with inconsistent moisture that will crack during drying.
Clay contaminated with plaster or other materials can develop weak spots where foreign particles interfere with clay particle bonding. These weak points become crack initiation sites during drying or firing.
The solution is proper clay storage and preparation. Keep clay sealed in airtight bags or containers. Before using clay that's been stored for a long time, cut through the entire bag to check moisture consistency. If you find dry outer clay with wet inner clay, wedge it thoroughly to redistribute moisture. Consider adding small amounts of water and allowing it to age in a sealed container for a week to equalize moisture.
Clay Body Too Plastic or Too Short
Highly plastic clays (lots of ball clay, bentonite, or fine particles) shrink significantly during drying and are prone to cracking from the stress of that shrinkage. Conversely, "short" clays with little plasticity and lots of grog or sand can crack because they lack the strength to withstand stress.
If you consistently experience cracking despite good technique, your clay body might not be ideal for the forms you're making. Consider trying a different clay formulation with different grog content or plasticity characteristics.
Preventing Cracks: Best Practices Summary
While we've covered many specific situations, several universal best practices prevent the majority of pottery cracking:
Slow, even drying is the single most important factor. Cover work loosely with plastic, maintain consistent room temperature and humidity, avoid drafts and direct sunlight, and allow extra time for thick pieces.
Maintain even thickness throughout your pieces when possible. Abrupt changes in thickness create stress points where cracks initiate.
Use proper attachment techniques with thorough scoring, generous slip application, and matched moisture levels between components.
Don't rush the drying process. A piece that feels dry to the touch still contains moisture internally. Allow extra time before bisque firing.
Follow appropriate firing schedules with slow initial temperature rise, careful heating through quartz inversion, and patient cooling before opening the kiln.
Work cleanly to prevent plaster contamination and other foreign materials in your clay.
Wedge clay thoroughly before use to remove air pockets and ensure even moisture distribution.
When Cracks Happen: Repair and Learning
Despite best efforts, cracks still happen to every potter. When they occur before firing, some can be repaired. Thin cracks in leather-hard clay can sometimes be worked closed by scoring the crack, applying slip, and compressing the area. Larger cracks usually indicate the piece should be recycled—attempt repairs, but don't be discouraged if they don't work.
Cracks that appear after bisque or glaze firing generally can't be repaired for functional use, though some potters embrace these pieces as learning opportunities or incorporate cracks into sculptural work using kintsugi-style repairs with gold or colored epoxy.
Each crack teaches you something about your process. Keep notes about when and where cracks appear, and over time you'll recognize patterns that help you adjust your technique. Experienced potters crack pieces too—it's an inherent part of working with a material that undergoes such dramatic transformations.
The journey from wet clay to finished ceramic involves careful attention at every stage, but with patience, proper technique, and understanding of how and why cracks form, you can minimize these frustrations and create successful work that survives the entire process intact.

Share:
Don't Have a Kiln? No Problem! Here's How to Rent One
Three Pottery Techniques: Handbuilding, Throwing, and Slip Casting Explained