
Attaching handles to pottery is one of those skills that separates functional potters from casual hobbyists. A well-attached handle is strong, comfortable, and visually integrated with the piece. A poorly attached handle cracks, pulls away, or looks awkward and stuck-on. Whether you're making mugs, pitchers, teapots, or casserole dishes, mastering handle attachment is essential for creating truly functional pottery. This comprehensive guide covers everything from making handles to attaching them securely, ensuring your handles stay put through drying, firing, and years of daily use.
Understanding Why Handles Crack and Fail
Before learning attachment techniques, it's crucial to understand why handles fail. This knowledge helps you avoid common mistakes and troubleshoot problems when they occur.
Moisture Mismatch: The Primary Culprit
The most common cause of handle failure is attaching clay at different moisture levels. When you attach a soft, freshly made handle to a leather-hard mug body, the handle contains significantly more water than the body. As both pieces dry, the handle shrinks more than the body, creating stress at the attachment points. This stress manifests as cracks where the handle meets the body, or the handle may pull away entirely.
The reverse problem also causes failure—attaching a leather-hard or dry handle to a softer body. As the body shrinks more than the handle during drying, it pulls away from the handle, again creating cracks at the joints.
Inadequate Scoring and Slip
Even when moisture levels match perfectly, handles can fail without proper scoring and slip application. Scoring creates mechanical grip—the rough, crosshatched surface allows clay from each piece to interlock. Slip acts as clay glue, filling gaps and creating a bonded joint. Skipping or rushing these steps results in weak attachments that may survive drying but fail during firing or use.
Poor Joint Compression
After scoring, slipping, and positioning the handle, many potters fail to properly compress the joint. Simply pressing the handle against the body isn't enough—you must work the clay together, blending handle clay into body clay and vice versa. This compression creates a strong, unified joint rather than two separate pieces barely touching.
Making Pottery Handles: Methods and Options
Before attaching handles, you need to create them. Several methods exist, each with distinct characteristics and aesthetic qualities.
Pulled Handles: The Traditional Approach
Pulled handles are the most common method for functional pottery, creating smooth, elegant handles with organic curves.
The pulling process: Take a thick coil of clay (roughly the diameter of a broom handle) and hold it in your non-dominant hand. Wet your dominant hand and stroke downward along the coil, gently pulling and thinning the clay. Each stroke lengthens the handle slightly. Continue pulling until you achieve desired thickness and length.
The key is gentle, consistent pressure with well-lubricated hands. Pulling too aggressively tears the clay. Too little water causes sticking and uneven pulling. The handle should taper slightly from top to bottom, with the thickest part at the top attachment point.
Timing for pulled handles: Pull handles and set them on a board to firm up slightly before attaching. They should be soft enough to curve and shape but firm enough to hold their form. This typically takes 15-30 minutes depending on humidity and temperature. Cover them loosely with plastic if you're not attaching immediately.
Extruded Handles
Handle extruders force clay through a die, creating consistent, uniform handles. This method is popular for production potters who need multiple identical handles.
Extruded handles come out soft and need to firm up on boards before use. They create handles with consistent cross-sections and professional appearance but lack the organic quality of hand-pulled handles. The choice between pulled and extruded is partly aesthetic preference and partly practical—production work often benefits from extruded consistency.
Slab-Built Handles
For angular, flat, or sculptural handles, cut strips from rolled slabs. These handles work beautifully on squared or architectural pottery where rounded, pulled handles might look incongruous.
Cut slab handles can be textured, stamped, or carved before attachment, offering decorative possibilities. Allow slabs to firm to leather-hard before cutting and attaching for best control and clean edges.
Coiled Handles
For rustic or textured work, handles made from thick coils offer visual interest. Roll coils to desired thickness, curve them into handle shapes, and allow them to firm slightly before attaching.
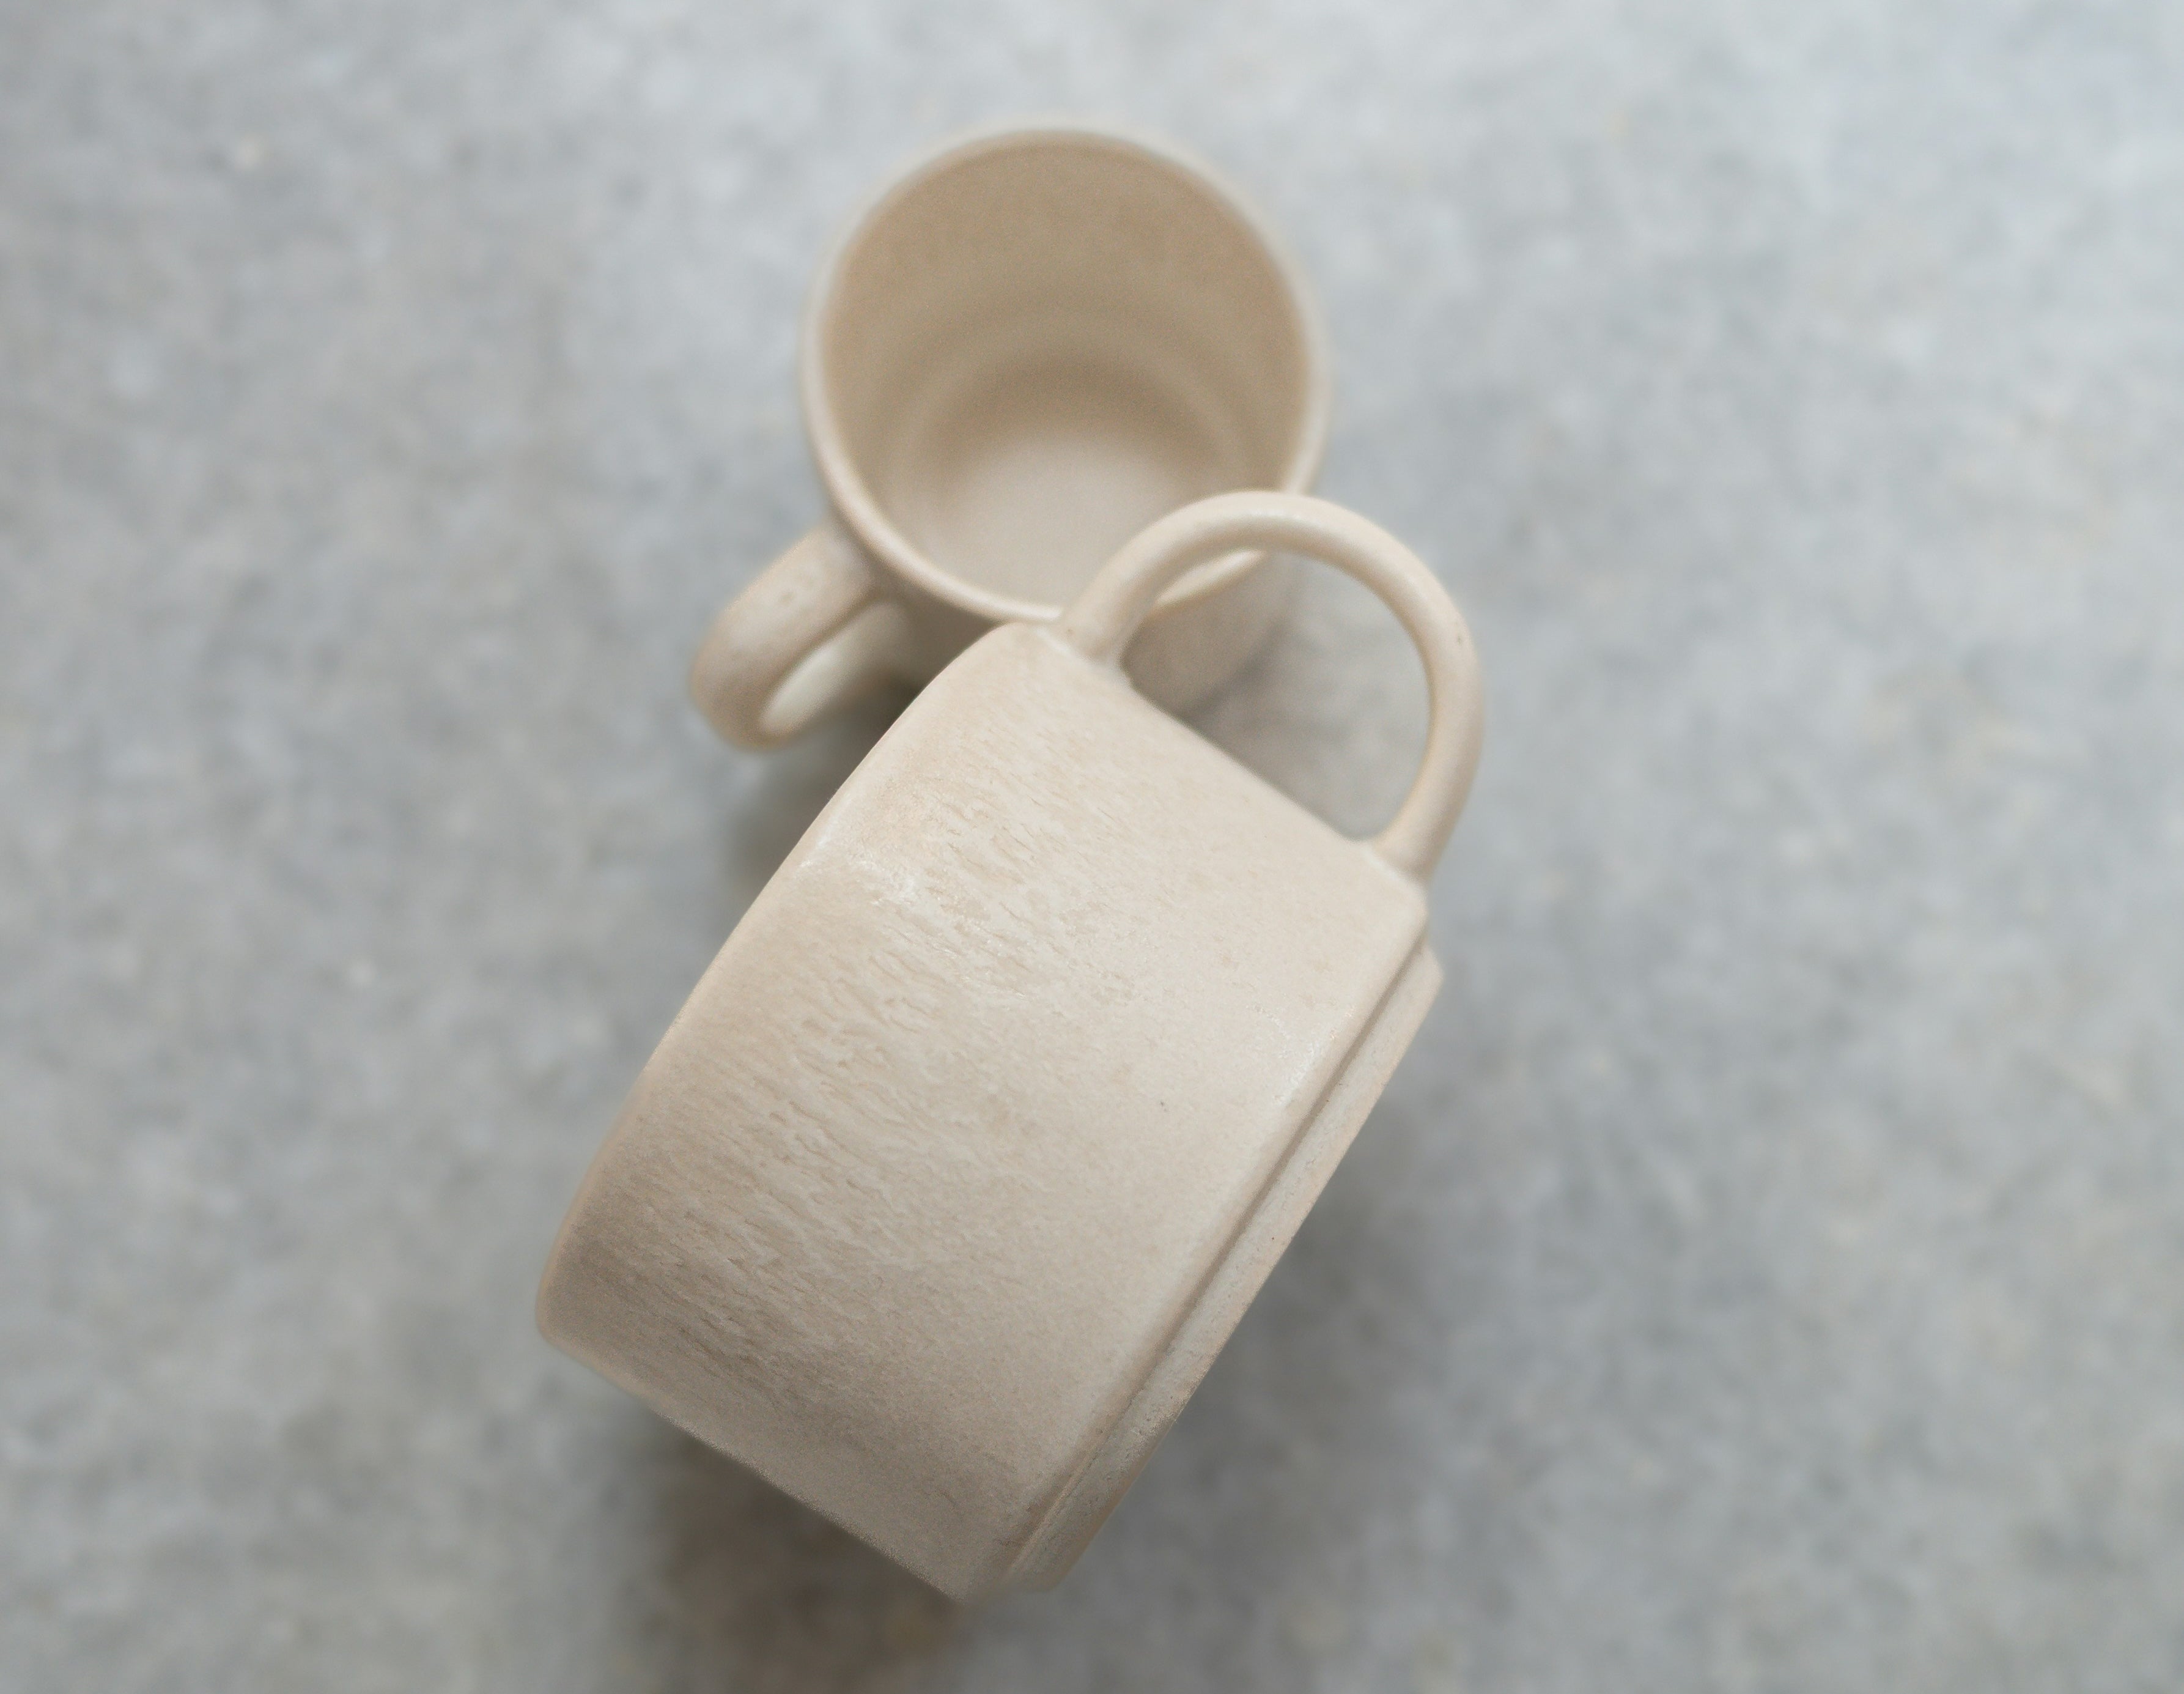
The Perfect Clay State: Leather-Hard to Leather-Hard
The golden rule of handle attachment is matching clay consistency—ideally, both handle and body should be leather-hard. Leather-hard clay has dried enough to hold its shape and feels cool and firm to the touch, but it's still damp enough to accept scoring and join securely.
Assessing Leather-Hard Clay
Leather-hard clay should:
- Feel cool and slightly damp to touch
- Hold its shape without deforming
- Accept pressure without fingerprints or dents
- Be soft enough to score easily
- Show uniform color without dry, light-colored spots
If your pot is leather-hard but your handles are still soft, let handles firm up under loose plastic. If handles are leather-hard but the pot is still soft, allow the pot to dry longer. Patience at this stage prevents problems later.
The Flexibility Window
There's actually a range of acceptable moisture levels. Both pieces can be slightly softer than leather-hard, or both can be on the firm side of leather-hard, as long as they match. What matters is similarity—handle and body should be at the same stage of drying.
Step-by-Step Handle Attachment Process
With properly prepared handles and bodies at matching moisture levels, you're ready to attach.
Step 1: Mark Attachment Points
Before scoring anything, hold the handle against the pot and mark attachment points with a pencil or needle tool. Consider:
- Handle height: Higher handles work for mugs used with hot liquids (keeping fingers away from heat), while lower handles suit beer steins or casual mugs
- Handle angle: Handles can be vertical, tilted slightly outward, or angled—choose based on comfort and aesthetics
- Spacing from rim: Leave adequate space between the top attachment and the rim for comfortable grip
Mark both where the top of the handle will attach and where the bottom will connect. Step back and evaluate the placement from multiple angles before committing.
Step 2: Score Both Surfaces Thoroughly
Using a serrated rib, needle tool, fork, or wire brush, score the pot where the handle will attach. Create deep crosshatch marks—parallel lines in one direction, then perpendicular lines crossing them. The scoring should be aggressive enough to roughen the surface significantly.
Score the back of the handle where it will contact the pot. For pulled handles, score the top inch or two (where it attaches) and the bottom curve that will press against the pot.
Step 3: Apply Generous Slip
Mix slip to the consistency of heavy cream—not watery, but fluid enough to brush on easily. Apply slip generously to all scored surfaces on both the pot and handle. Don't be stingy—slip is what bonds the pieces together.
Some potters make slip from the same clay they're using, ensuring perfect compatibility. Simply mix clay scraps with water until you achieve the right consistency. Others use commercial slip or thick vinegar-enhanced slip for extra grip.
Step 4: Position and Press the Handle
Press the top of the handle firmly onto the upper attachment point. The handle should stick immediately—if it slides or doesn't grip, you need more slip or better scoring.
Curve the handle and press the bottom attachment point against the pot. Adjust the curve to achieve your desired handle shape—tighter curves for small mugs, gentler curves for larger vessels.
Step 5: Compress and Blend the Joints
This critical step is where many potters shortchange themselves. Use your fingers, a wooden tool, or a small rib to blend clay at the attachment points. Work clay from the handle into the pot body and from the pot body into the handle.
At the top attachment: Smooth clay upward from the handle onto the pot, creating a gradual transition. Then smooth clay downward from the pot onto the handle. Work all around the attachment point, creating a reinforced area.
At the bottom attachment: Blend clay similarly, creating a smooth transition. For extra strength, add a tiny coil of soft clay along the joint line, then blend it thoroughly into both handle and body.
The goal is erasing the joint line so it appears the handle and body are one piece of clay, not two pieces stuck together. This blending creates structural strength and professional appearance.
Step 6: Refine the Attachment
Step back and examine your work. Use a damp sponge to smooth any rough areas. Ensure transitions are gradual and natural-looking. Check that the handle is positioned correctly and curves smoothly.
For pulled handles, you can stroke the handle gently while it's attached to refine its curve and thin it slightly if needed. Be gentle—aggressive manipulation can break the fresh joints.
Step 7: Allow Moisture to Equalize
After attaching handles, cover the entire piece loosely with plastic for several hours or overnight. This allows moisture from the handle to equalize with the body, reducing stress as drying continues. After this equalizing period, you can resume normal drying.
Special Techniques for Different Handle Styles
Different handle types require slight variations in attachment technique.
Strap Handles
Wide, flat handles made from slabs require scoring and slipping the entire back surface that contacts the pot. Compress edges thoroughly and consider adding small reinforcing coils along both sides of the attachment, blending them smoothly into handle and body.
Loop Handles on Casseroles
Horizontal handles on casserole dishes attach at two points along the rim. Ensure both attachment points are at exactly the same moisture level. Compress both attachments thoroughly and blend a reinforcing coil along the interior attachment points where stress will concentrate during use.
Lug Handles
Small decorative handles or lugs are often pressed into the pot surface rather than attached to the exterior. Create a depression in the pot body at leather-hard stage, score the depression and the back of the lug, slip both surfaces, and press the lug into the depression. Blend the edges thoroughly.
Multiple Handles
For teapots with side handles and cane handles, or vessels with multiple decorative handles, attach all handles during the same session when everything is at the same moisture level. This ensures consistent drying and shrinkage across all attachments.
Troubleshooting Handle Problems
Even experienced potters occasionally have handle issues. Here's how to address common problems.
Cracks Appearing at Attachment Points During Drying
This indicates moisture mismatch or inadequate compression. If cracks appear before bisque firing, you can sometimes repair them. Wet the crack thoroughly, work slip into it, then compress the area firmly. Cover the piece with plastic for 12-24 hours to allow moisture to penetrate and relax the clay, then resume drying.
Prevention: Ensure matching moisture levels and thorough compression of joints during attachment.
Handles Pulling Away from Body
Complete separation suggests inadequate scoring and slipping or extreme moisture mismatch. This is difficult to repair—you may need to remove the handle completely, re-score and re-slip, and reattach.
Prevention: Don't skip scoring and slipping steps, even if you're in a hurry.
Handles Cracking During Firing
Handles that survive drying but crack during firing may have trapped air pockets in the joints or may be too thick where they attach. Ensure thorough compression of joints eliminates air gaps. Keep attachment areas at similar thickness to the handle and body.
S-Cracks at the Bottom Attachment
Crescent-shaped cracks at the bottom attachment point indicate the handle was wetter than the body when attached. The handle shrank more, pulling away from the body as it dried.
Prevention: Wait for handles to firm up to match the body before attaching.
Handles Feel Weak or Wobbly
Weak handles resulted from inadequate compression and blending at attachment points. When attaching future handles, spend more time working the clay together at joints. Consider adding reinforcing coils and blending them thoroughly.
Aesthetic Considerations for Handle Placement
Beyond structural concerns, handle placement affects the piece's visual appeal and functional comfort.
Proportion and Scale
Handle size should match the vessel. Oversized handles on small mugs look awkward, while tiny handles on large pitchers feel uncomfortable. The handle should be proportional to the pot's volume and weight when full.
Visual Flow
Handles should appear to grow naturally from the pot rather than looking stuck on. Smooth transitions, careful blending of attachment points, and harmonious curves create visual flow. Step back and evaluate the piece from multiple angles—a handle that looks good from the front might appear awkward from the side.
Functional Comfort
Hold the piece with the handle to test comfort. Your fingers should fit comfortably through the loop without scraping the pot. The handle should balance the piece when lifted. For mugs, consider how the handle angle affects drinking comfort.
Pulled Handle Curves
The curve of a pulled handle contributes significantly to aesthetics. Gentle curves feel elegant and refined, while tighter curves suit rustic or casual pieces. Practice pulling handles with different curves to develop your signature style.
Tips for Production Handle Attachment
Potters making multiples of the same form develop efficient handle attachment routines.
Batch Processing
Throw multiple mugs in one session, pull all handles at once, and attach them all when both handles and mugs reach leather-hard stage. This assembly-line approach ensures consistent moisture levels and develops muscle memory for consistent placement.
Handle Templates
Create cardboard or plastic templates showing handle placement marks. Hold the template against each mug and mark attachment points, ensuring identical placement across multiple pieces.
Consistent Handle Thickness
Whether pulling or extruding handles, develop consistency in handle thickness. Customers buying sets expect handles to feel similar across all pieces. Practice until you can reliably create handles of matching dimensions.
Quality Control
Examine each attachment carefully before moving to the next piece. Fixing problems immediately is far easier than discovering issues after bisque firing.
Advanced Handle Techniques
Once basic handle attachment becomes second nature, explore advanced techniques.
Decorative Attachments
Add texture to handle surfaces by pressing stamps or texture tools into leather-hard handles before attaching. Carve patterns into attached handles at leather-hard stage for decorative effects.
Altered Handles
After attaching pulled handles, reshape them by pressing, twisting, or faceting. These alterations add visual interest and create unique handles. Work gently to avoid stressing attachment points.
Intentionally Exposed Joints
Rather than completely blending attachment points, some potters leave them visible as design elements. This approach works for rustic or casual aesthetics and requires confident, clean attachments that look intentional rather than sloppy.
Conclusion: Practice Makes Perfect Handles
Handle attachment is a skill requiring practice to master. Your first few handles may crack, pull away, or look awkward. This is normal and expected. Every experienced potter has made countless failed handles along the path to mastery.
Focus on the fundamentals—matching moisture levels, thorough scoring and slipping, proper compression of joints—and your success rate will climb quickly. Pay attention to what works and what doesn't. When a handle fails, analyze why and adjust your technique.
With patience and practice, handle attachment becomes intuitive. You'll develop a feel for proper moisture levels, learn how much compression creates strong joints, and discover the handle shapes and placements that suit your aesthetic. Beautiful, functional handles that stay attached through years of use become a signature of your work, transforming simple vessels into treasured functional art.
Share:
Hand Building Pottery Techniques: A Complete Guide for Creating Beautiful Ceramics Without a Wheel